Developer Guide for ra.VI
Table of Contents
1 Setting up
1.1 Software Prerequisites
1.2 Setting up the work environment
1.3 Verifying the setup
1.4 Configure coding style
2 Design
2.1 Architecture
2.1.1 Main Classes and Main Command Loop
2.1.2 Command Family
2.1.3 Data Family
2.1.4 Parser Family
2.1.5 Timetable Family
2.2 Implementation
2.2.1 Add/Delete Feature
2.2.2 List Feature
2.2.3 Cap Feature
2.2.4 Grade Feature
2.2.5 Undo the Previous Command
2.2.6 Timetable Feature
2.2.6.1 Add lesson/s to timetable
2.2.6.2 Delete lesson/s from timetable
2.2.6.3 View the timetable
2.2.6.4 Filter the timetable
2.2.6.5 Reset the timetable
2.2.7 [Proposed] Notes Feature
2.2.7.1 Add notes
2.2.7.2 Viewing list of notes
2.2.7.3 Delete a note
2.2.7.4 View notes
2.2.8 Colored Output
3 Appendix A: Product Scope
3.1 Target user profile
3.2 Value proposition
4 Appendix B: User Stories
5 Appendix C: Non-Functional Requirements
6 Appendix D: Glossary
7 Appendix E: Instructions for manual testing
7.1 Task
7.1.1 Adding a task
7.1.2 Deleting a task
7.1.3 Editing a task
7.1.4 Marking a task as done
7.1.5 Viewing the task list
7.1.6 Viewing task summary
7.2 Module
7.2.1 Adding a module
7.2.2 Deleting a module
7.2.3 Editing a module
7.2.4 Viewing the module list
7.3 Viewing help messages and prompts
7.4 Timetable
7.4.1 Amending the timetable
7.4.2 Viewing the timetable
7.4.3 Filtering the timetable
7.4.4 Resetting the timetable
7.5 Calculating the Accumulated Cap after the current semester
7.6 Grading an existing module in module list
7.7 Undo the previous command
7.8 Saving data
1 Setting up
The following section describes how to set up ra.VI on your own computer.
1.1 Software Prerequisites
- JDK 11
- IntelliJ IDEA
1.2 Setting up the work environment
- Fork this repo onto your GitHub account. Clone it onto your computer.
- Open IntelliJ. Close any existing projects if you are not at the welcome page.
- Ensure it is set to the correct JDK version. a.
Configure>Project Structure for New Projects> Select Java 11 under Project SDK. - Click
Open or Importto open the cloned repo. - If necessary, locate the
build.gradlefile and select it. Click OK.
1.3 Verifying the setup
- Run the program by selecting the
runGradle task at the top right and running it. - Test the program by trying to run commands.
- Additionally, select the
testGradle task and run it. Check that all the tests pass.
1.4 Configure coding style
ra.VI's code uses the Gradle Checkstyle plugin. It is advised to change IntelliJ's built-in code style options to match the requirements.
The checkstyle configurations is in <ROOT>/config/checkstyle/ by default. Here is some information on how to use the Checkstyle plugin with IntelliJ IDEA.
2 Design
2.1 Architecture
2.1.1 Main Classes and Main Command Loop
This is a class diagram of the top-level of ra.Vi.
The classes depicted here are those which are direct dependencies of the main class Ravi.
The various dependencies of the classes depicted here are not shown to avoid cluttering, and are described in later sections.

The main class holds the main loop. Most classes used by the main class are static in nature and do not need to be instantiated.
Executor can be viewed as a simple layer of abstraction on top of Command, CommandResult, StateManager, TimeTableManager, InputOutputManager to facilitate the execution of user commands, while reducing the dependencies of the main class. Command is a dependency of Parser as Parser creates Command objects to return to the main loop.

This sequence diagram shows the activity of the main class, Ravi. When it starts, it first adds the shutdown hook to handle both unexpected and normal shutdowns.
start() and runCommandLoopUntilExitCommand() are referenced in sequence diagrams below.
Following that, Ravi calls the run() function, which is just a wrapper for the two methods start() and runCommandLoopUntilExitCommand(). start() may throw an exception while trying to load the NUSMods data; if it cannot load the NUSMods data, run() will show the error message to the user using TextUi then return to main(), where main() terminates and ra.VI shuts down.
After start() runs successfully, runCommandLoopUntilExitCommand() will run until the user gives the exit command, bye. Subsequently, run() will return, main() will terminate, and ra.VI shuts down.
The shutdown hook runs right before ra.VI shuts down (i.e. when main() terminates or when the process is shut down via any other means other than SIGKILL). It prints a shutdown message as described in the diagram to assure the user that their data is saved.
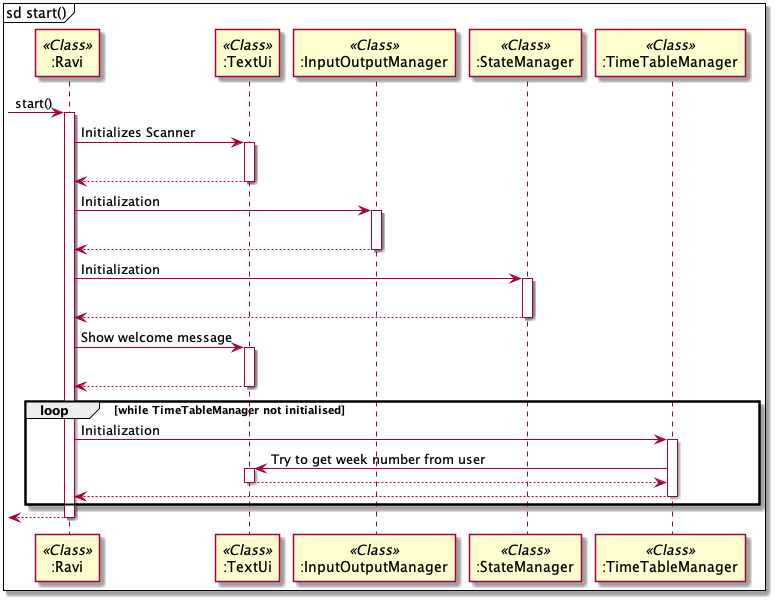
This sequence diagram holds the reference for start().
TextUi is initialised with a new Scanner object set to System.in to get user input.
InputOutputManager is initialised, which makes it load all user data files and NUSMods data. It will return the results of the load (i.e. success or failure) which will be displayed by TextUi later on. As mentioned earlier, if it fails to load NUSMods data (when resource file is corrupted and there is no Internet connection), it will throw an exception so that ra.VI terminates.
StateManager is initialised, creating the empty stacks of ‘snapshots' as well as pushing the first snapshot (which is the starting state) to the stack.
TimeTableManager is initialised. The user is required to input the current NUS week.
- If it is currently before or exactly Week 6 of the semester, the user should input the actual week number.
- If it's currently recess week, the user should input "7".
- If it's currently after recess week, the user should input the current week number plus one (to account for recess week). There is a validation loop to catch invalid user input.
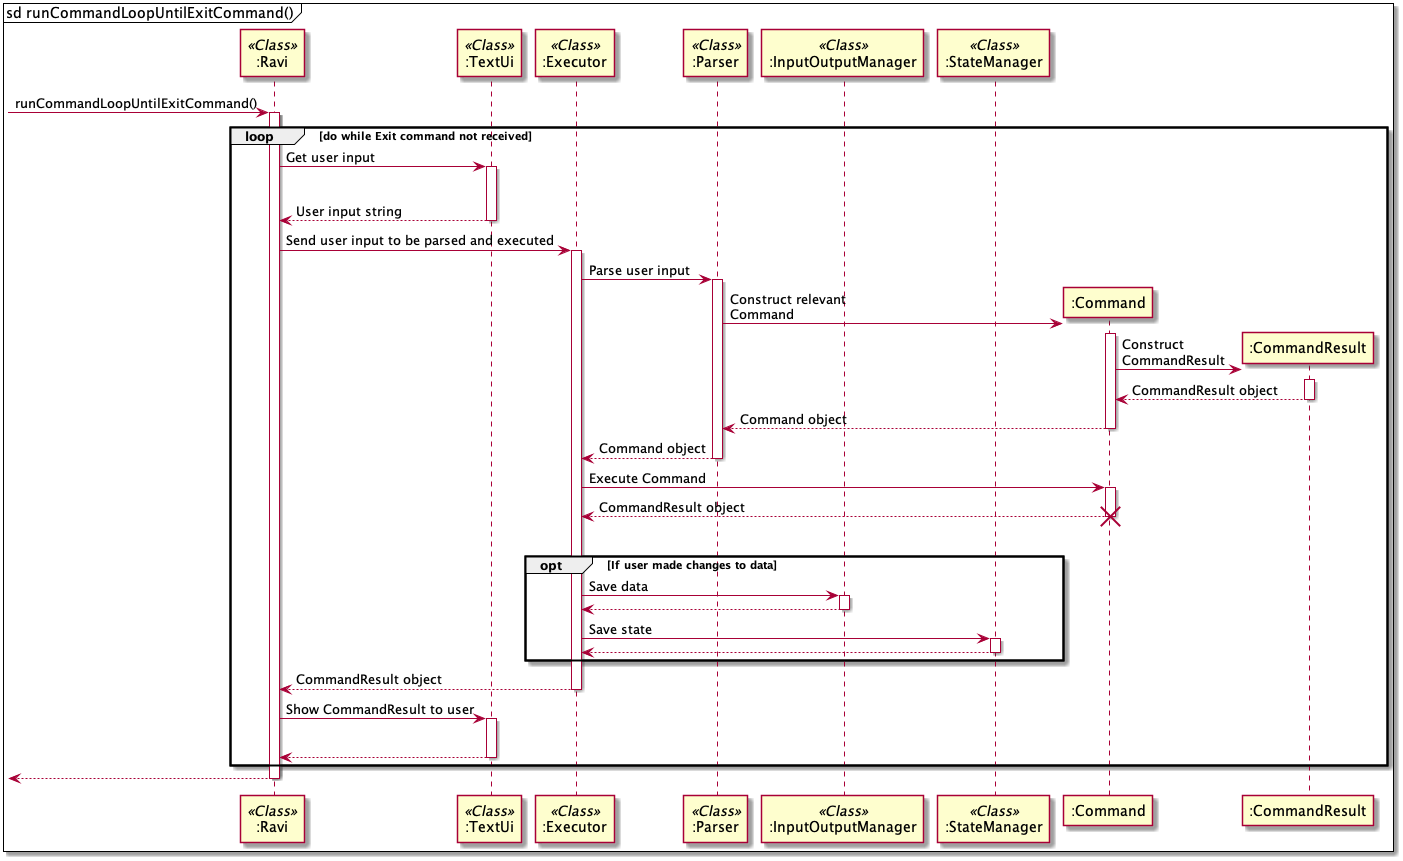
The main loop is contained in the runCommandLoopUntilExitCommand() method. The main loop follows the following steps:
- Get the user input as a string.
- Send the user input to
Executor. -
Executorparses the input usingParserand gets aCommandobject. - It then executes the
Commandobject with theexecute()method. This will do the necessary work and return aCommandResultobject. - If any data was changed,
ExecutorrunsStateManager'ssaveState()to facilitate undo commands, andInputOutputManager'ssave()to save all user data as a measure against unexpected shutdowns. - Finally, use the
CommandResultobject to show the result of theCommandto the user usingTextUi.
Note that the
Executorclass wraps theInputOutputManagerclass
2.1.2 Command Family
The Command family of classes are nearly all derived from the abstract Command class, except for CommandResult and PromptType. All Command classes belong to the Command package. This is shown in the diagram below.

PromptType indicates the functionality of the Command object. The most useful type is EDIT, which indicates to StateManager that there has been a change in state.
The Command classes carry information about the user's command. There is one class for each exact user command. The execute() function of the Command class generates a CommandResult, which holds the reply to the user. This is shown in the diagram below.

2.1.3 Data Family
The Data family of classes consists of all the abstracted data types required for our features, such as Task, Module, and their respective Managers. All Data classes exist in the data package, and the classes in charge of saving and loading like InputOutputManager are in the storage subpackage.

Lesson, Task, and Module are the base level abstractions, with their respective Managers containing the logic to store and manipulate instances of these objects in a meaningful way. InputOutputManager reads and writes information from the various Managers in order to save and load. State and StateManager are specifically for undo functionality. They do not interact directly with the rest of the Data family.
LessonFilter is the only interface in the data package. It allows for flexible creation of filters for powerful user filtering of lessons via lambda functions. For example, the user can choose to filter only lectures on Mondays before 2PM.
Since there is no Command to save or load, InputOutputManager is not a dependency of Command. All the other Managers, however, are dependencies of Command as there are commands for using/manipulating each one of them. InputOutputManager and Command are then dependencies of the main class Ravi.
ra.VI loads the user saves granularly to prevent any errors in loading one file from affecting the rest. The full sequence diagram is below, separated into three sections.
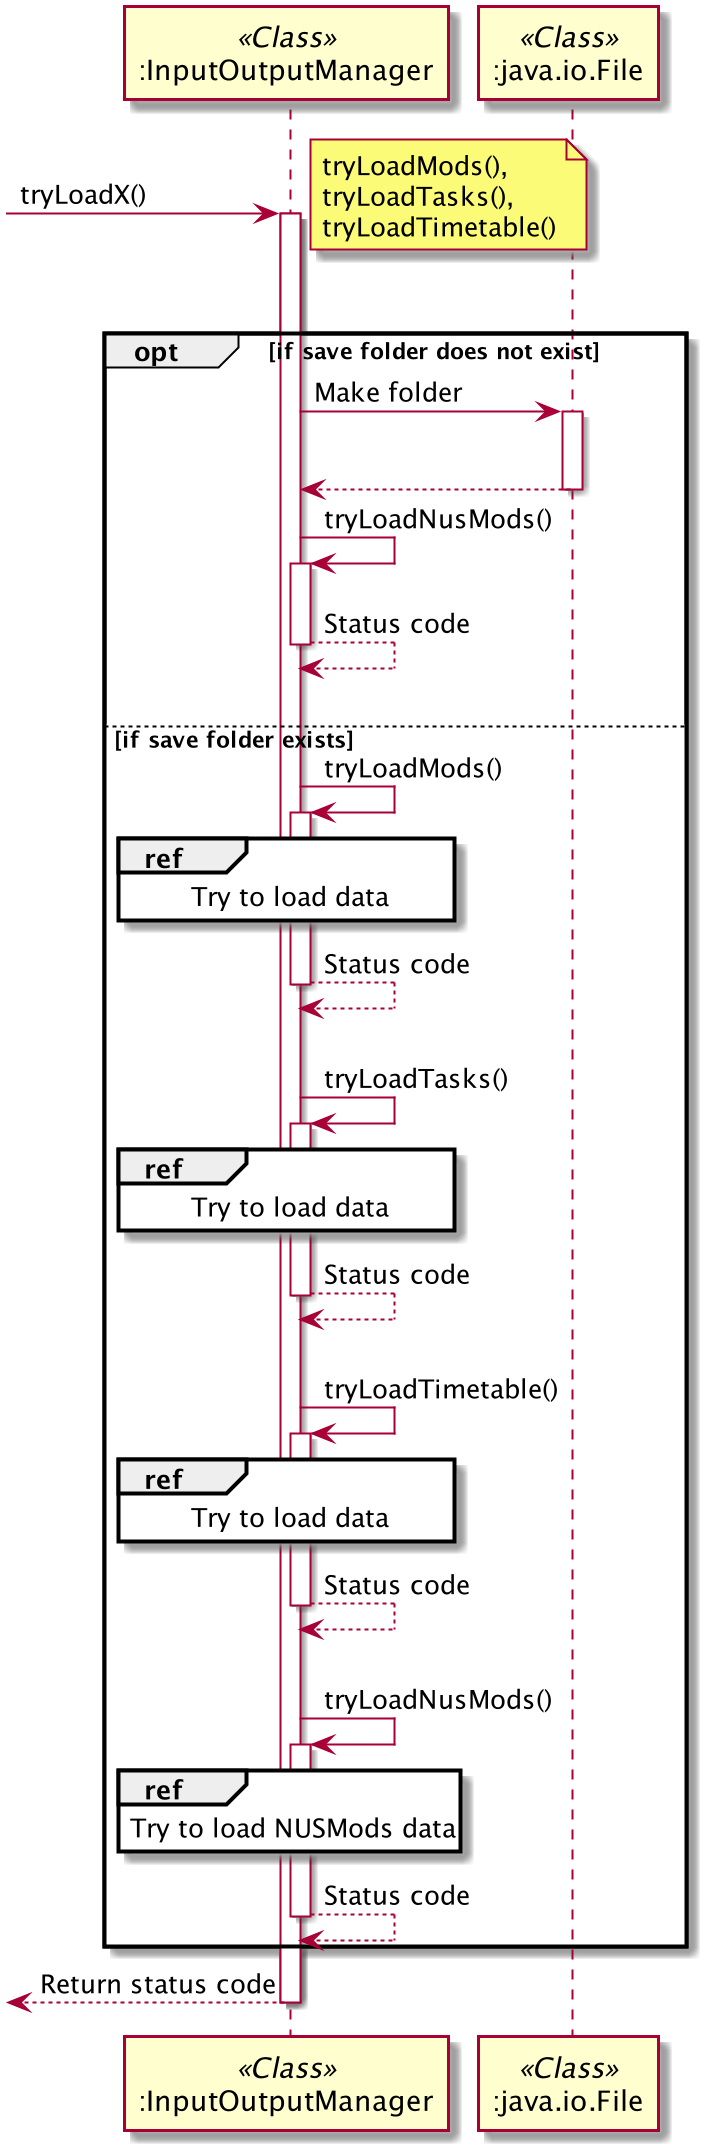
The above is the main loading diagram. ra.VI tries to load each save file separately. The tasks, modules, and timetable save files are handled in the same way. The NUSMods save file is handled in a different way as it is possible to load from the NUSMods API or the prepackaged NUSMods resource file in the JAR release.
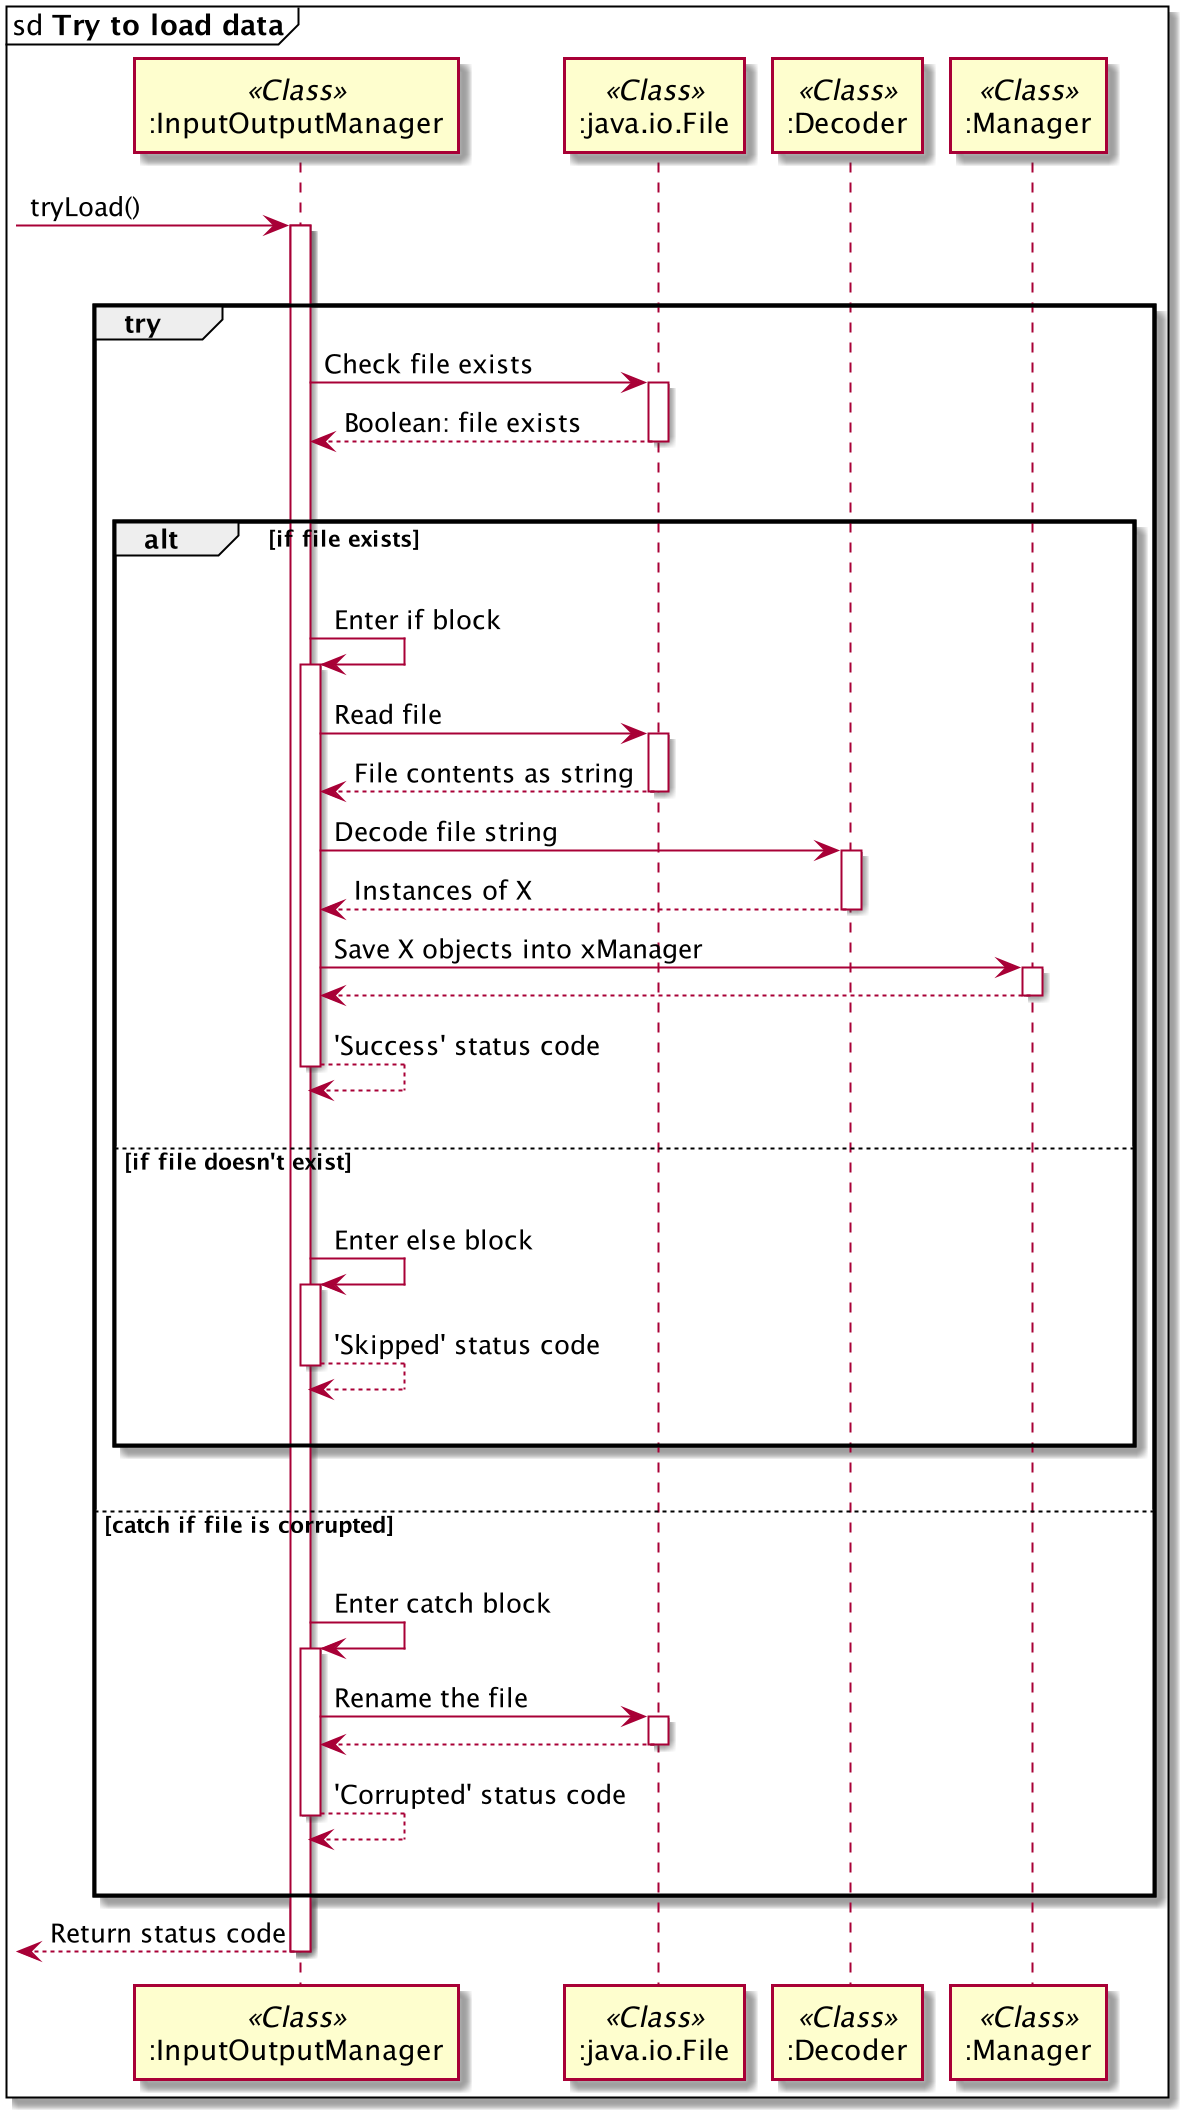
InputOutputManager uses the File and Decoder classes to read from the file and decode the contents into the data objects (using FastJSON). Depending on whether the file exists or whether exceptions are thrown, the status code is updated and returned accordingly.
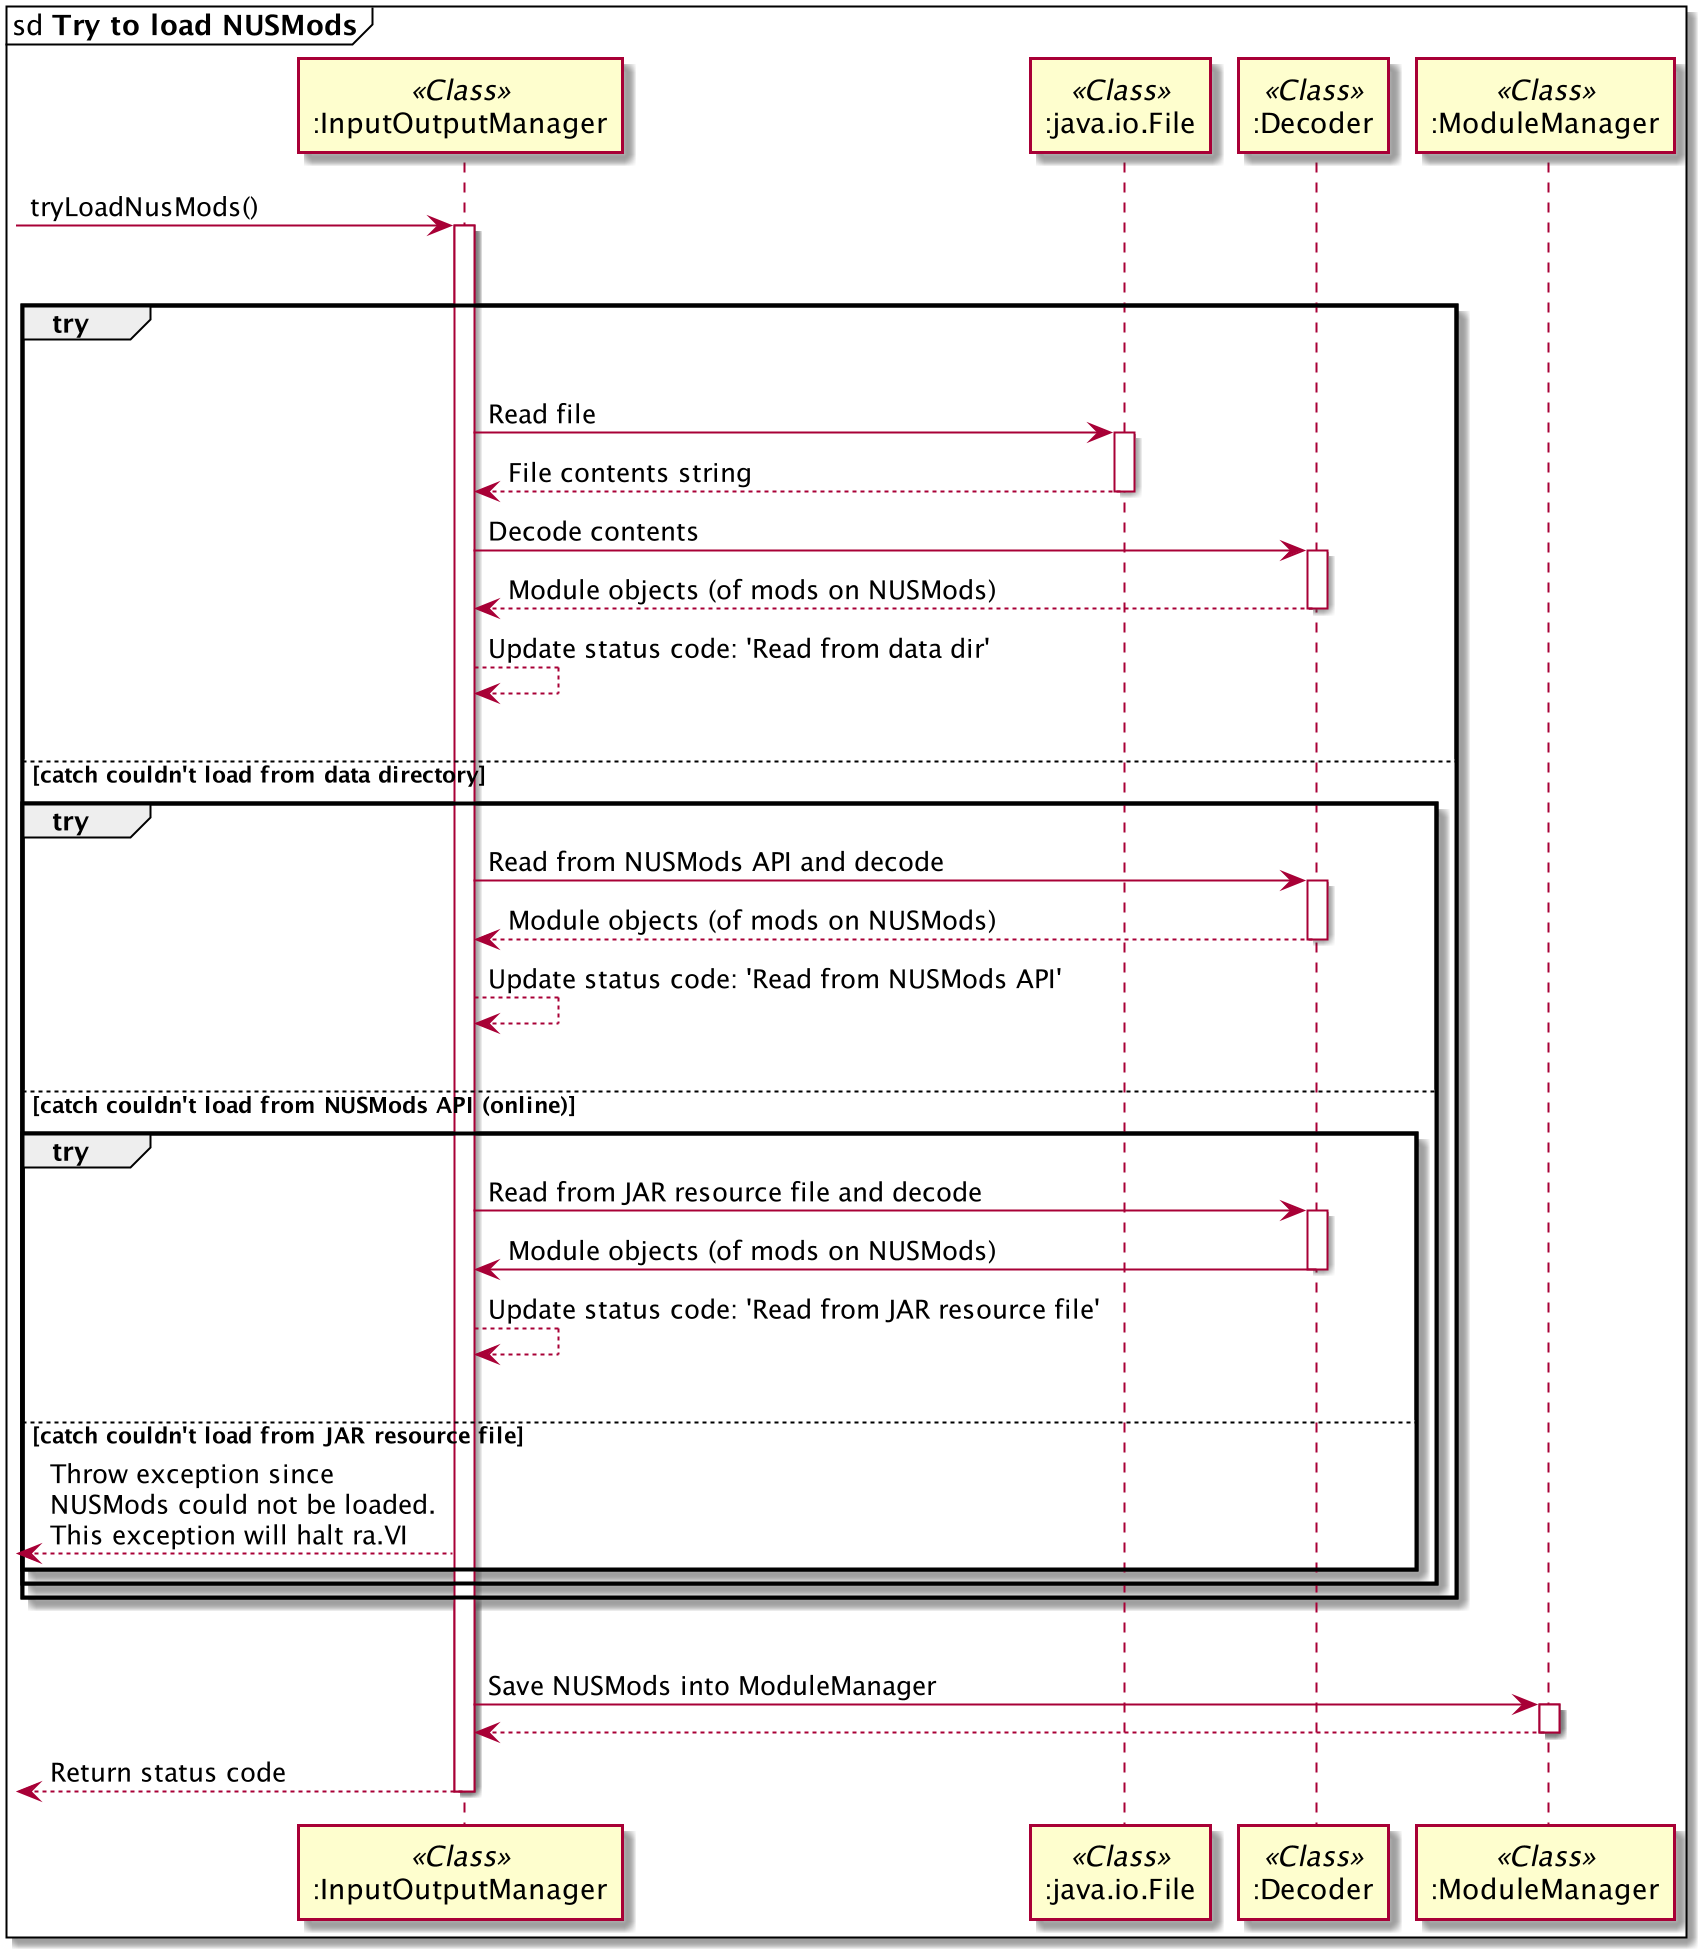
For NUSMods, the same principles apply. However, there is a chain of try-catch blocks to serve as fallbacks if one loading measure fails.
- Try to load from the data directory. The NUSMods data is saved in the data directory to serve as a cached, most up-to-date version of the data for faster and more accurate data.
- Failing that, try to load from the NUSMods API. This is slightly slower and requries the user to have an internet access.
- Failing both of the above, try to load from the JAR resource file. The JAR release will hold a version of the NUSMods data that we stored in case of these situations. This version may be out of date, however, but it's the next best option available.
- Failing all the above,
InputOutputManagerwill throw an exception that causes ra.VI to shut down. There will be a message prompting the user to re-download the JAR release if they can do so, as it is likely that the JAR file is corrupted in some way.
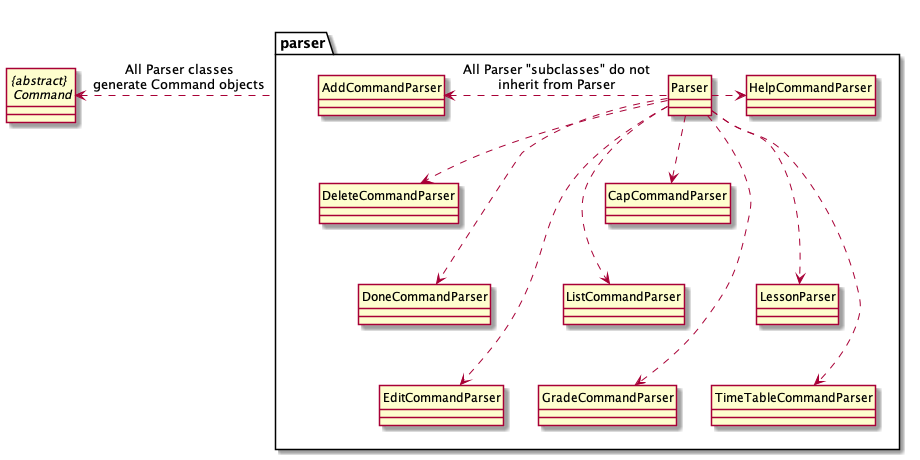
2.1.4 Parser Family
The Parser family of classes consists of the main Parser class and the xCommandParser subclasses. The main Parser class first determines the main Command in the user Command string. If it is one of the 10 commands with a xCommandParser subclass, then Parser delegates the remaining work to the subclass due to the complicated logic involved. Otherwise, it handles the logic itself.
Parser "subclasses" do not inherit from the Parser class. They serve to organise the code that would otherwise all be placed in the Parser class.
Parser will create a Command object, no matter whether the user Command is valid or not (if it is not, then an IncorrectCommand object is created). This Command object passes back to the main class Ravi for execution.
2.1.5 Timetable Family
The Timetable Family of classes is an example of a cross-family family of classes from the Data and Command families, and consists of the TimeTableCommand and TimeTableCommandParser classes, as well as TimeTableManager and TimeTable themselves. Extending from the abstract TimeTableCommand class are the TimeTableAddCommand, TimeTableDeleteCommand, TimeTableViewCommand, and TimeTableResetCommand classes.

This is a good representation of how the other data classes (Task, Module) work as well. The Command objects call the methods held in the Manager classes to perform work on the stored user data. There are the classic getters and setters, as well as more elaborate adding, deleting, editing, and viewing methods with logic for validation.
Upon the first start up of ra.VI, TimeTableManager.initialise() will be run. This will no longer run again in future sessions as long as the user does not tamper with or delete the files in the created data folder, or use ra.VI elsewhere.
The TimeTable is created based on the user's initial input, with an appropriate number of LessonManagers. The point of entry for this feature will be at TimeTableCommandParser, which will decide which of the commands to return through parseTimeTableCommand(). If the TimeTableCommand is returned and executed, the TimeTableManager will carry out the associated commands, adding, deleting or viewing the lessons in the timetable.
2.2 Implementation
This section serves to provide an overview of how certain features are implemented, not provide a comprehensive explanation of all features in ra.VI.
2.2.1 Add/Delete Feature
This feature is facilitated by the TaskManager, ModuleManager classes. Extending from the abstract Command class are the AddModuleCommand and AddTaskCommand classes. This feature implements the following operations:
- Add tasks - Add a task to the task list through
TaskManager.add() - Add modules - Add a module to the module list through
ModuleManager.add() - Delete tasks - Deletes a task from the task list through
TaskManager.delete() - Delete modules - Deletes a module from the module list through
ModuleManager.delete()

As seen from the sequence diagram above, this is the flow of an add command. This flow is similar to that of a delete command with the naming being the only difference.
AddCommand is an abstract class, inheriting from it are AddTaskCommand and AddModuleCommand.
The AddCommandParser decides to create either AddModuleCommand, AddTaskCommand or IncorrectCommand objects based on the user input.
Each of these have an execute() function that creates a CommandResult object that shows the user the result of the Command through TextUi, using showOutputToUser()
Given below is an example usage scenario and how the add feature behaves at each step.
-
The user launches the application for the first time.
-
The user inputs
add -m CS2101into ra.VI, as the user wants to note down a module named ‘CS2101' and add it to their module list.
TextUireceives the input as a string.ParserandAddCommandParserparse the string before creating anAddModuleCommand. -
The
AddModuleCommandis executed, returning aCommandResultcontaining a success message if the module has been successfully added.
Otherwise, an exception message will be shown explaining the exception to the user.
Common reasons for failure include:
- Wrong command format
e.g.add --t task
e.g.add -t task --by 2-10-2020 1400
e.g.add -m Fake Mod
e.g.add -t task -by 2nd Jan - Module already exists in module list
e.g.add -m CS1010but the module list already containsCS1010
2.2.2 List Feature
This feature is facilitated by the TaskManager and ModuleManager classes.
It extends from the abstract Command class.
This feature implements the following operations:
- List tasks - List all tasks in the task list through
TaskManager.list() - List modules - List all modules in the module map through
ModuleManager.list()
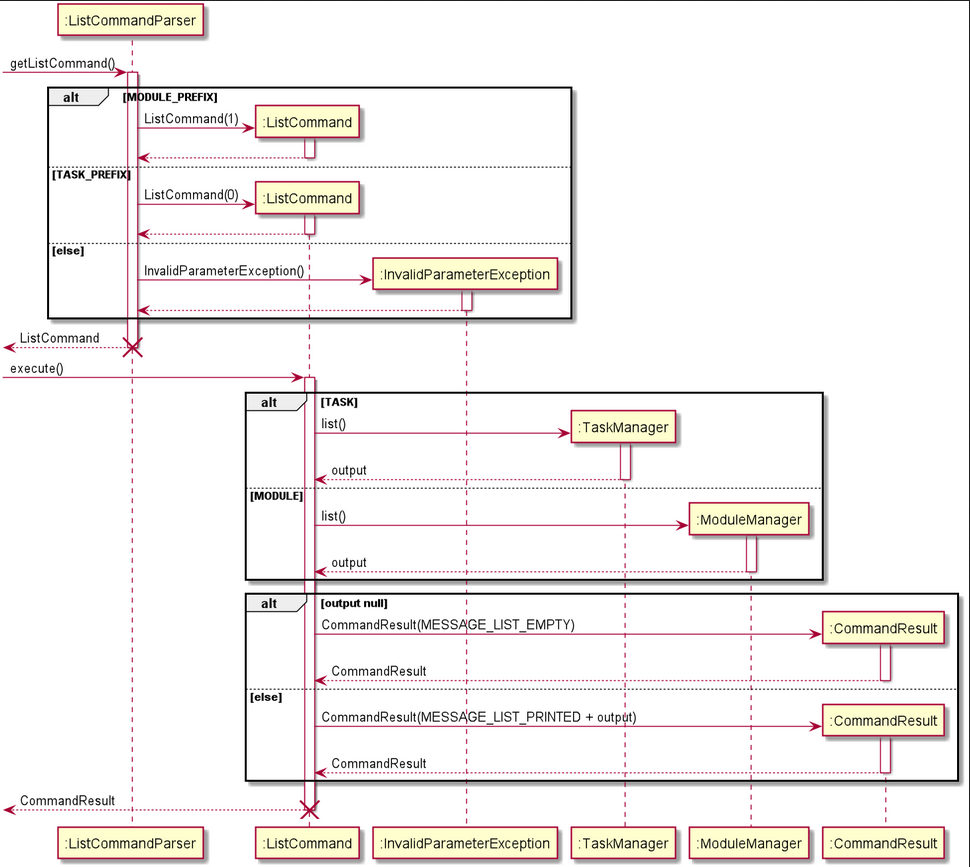
As seen from the sequence diagram above, this is the flow of ListCommand.
ListCommandParser class calls ListCommand(1), ListCommand(0), or throws an InvalidParameterException() based on the user input.
ListCommand has an execute() method. Depending on the type of entry, ListCommand calls list() method of TaskManager if it is "TASK", or list() method of ModuleManager if it is "MODULE".
If output is null, ListCommand calls CommandResult(MESSAGE_LIST_EMPTY), creating a CommandResult object. Else, ListCommand calls CommandResult(MESSAGE_LIST_PRINTED + output), creating a CommandResult object.
ListCommand returns CommandResult.
Given below is an example usage scenario and how the list feature behaves at each step.
- The user launches the application for the first time.
- The user inputs
add -t Read bookinto ra.VI, adding the task to the task list in TaskManager. The user keys in multiple other tasks of the following:add -t Return book -by 2-10-2020 1400add -t Meeting
- The user inputs
add -m CS2113Tinto ra.VI, adding the module to the module map in ModuleManager. The user keys in multiple other modules of the following:add -m CS2101add -m CG2271
-
The user inputs
list -t. TheCommandResultreturns
``` Here's your list: - return a book [x]
- read a book [x], by 07:00PM, Sunday, 02 Feb 2020 ```
-
The user inputs
list -m. TheCommandResultreturns
``` Here's your list: - CS1010: Programming Methodology (0.0MC) (Grade: No grade yet)
- CS3235: Computer Security (0.0MC) (Grade: No grade yet) ```
2.2.3 CAP Feature
This feature is facilitated by ModuleManager and Module class It extends Command and runs through the ModuleManager, checking every Module's grade and module credit.
- Calculate user's CAP - Uses a formula to calculate the user's current cap.
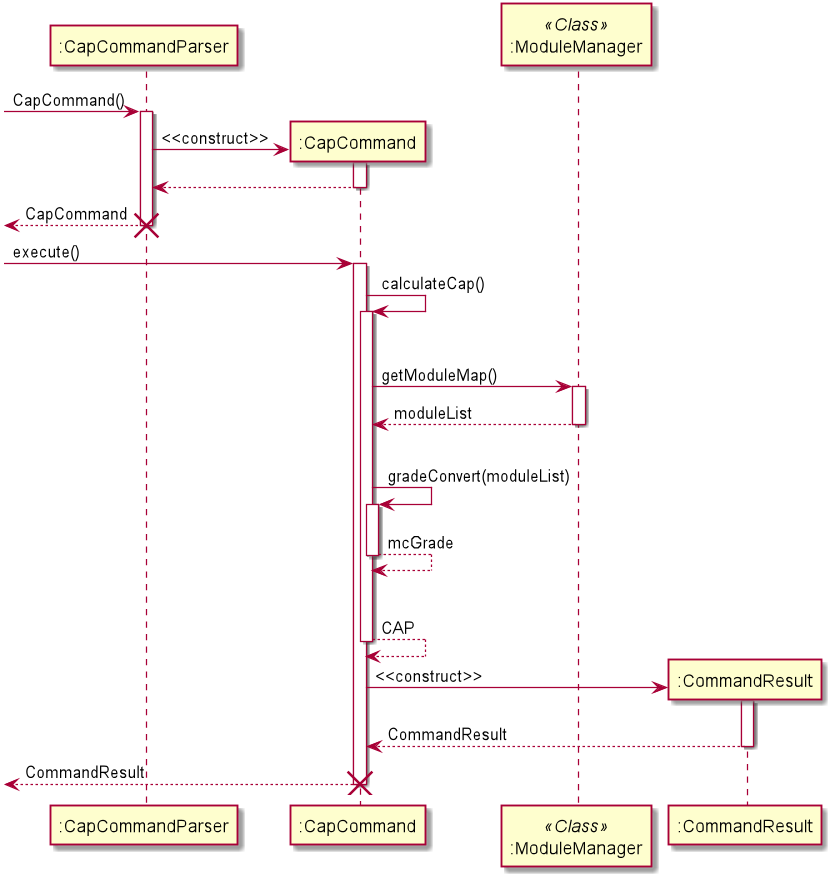
As seen from the sequence diagram above, this is the flow of a CAP command. The CapCommandParser parses the user's input and calls the CapCommand constructor. When CapCommand executes, a CommandResult object is created that calculates the user's current cap after taking into account the user's current modules and the users's total MC taken based on the modules graded.
Given below is an example usage scenario and how the CAP feature behaves at each step.
-
The user launches the application for the first time.
-
The user inputs
add -m CS2101into ra.VI, as the user adds a module they are taking into theModuleManager. The user keys in as many modules into ra.VI as they are taking. -
Once the user attains a grade for the modules keyed in, they input
grade CS2101 4 A-(4 MCs, A grade) to record the grade for their module. They does this for all the other modules they have taken. -
Once every module in the
ModuleManagerhas been graded, they inputscapto calculate their accumulative CAP after attaining their new grades. -
The
CommandResultreturns the success message to show the user their current CAP after attaining their grades.
2.2.4 Grade Feature
This feature is facilitated by ModuleManager and Module classes. It extends Command and is stored internally inside Module as a grade and moduleCredit.
- Grading a module - assigns a grade and MC number to a specific module present in the module list.

As seen from the sequence diagram above, this is the flow of a Grade command. The GradeCommandParser parses the user's input, and assigns the relevant attributes in the GradeCommand constructor, such as moduleCredit and grade. When GradeCommand executes,a CommandResult object is created that shows the user the result of the Command through TextUi, using showOutputToUser().
Given below is an example usage scenario and how the grade feature behaves at each step.
-
The user launches the application. The user inputs
add -m CS2101into ra.VI, as the user wants to note down a module named ‘CS2101' and add it to their module list. -
The user inputs
grade CS2101 4 A+. TheParserparses and allocates the user input toGradeCommand.GradeCommand.execute()is called andModuleManagerchecks if such a module exists in the user's module list, then checks if the input grade is valid according to the NUS grading schematic. Finally, it assigns the specific module with the grade and module credits. -
The
CommandResultreturns the success message to show the user that their module has successfully been graded. Otherwise, an exception message will be shown regarding the exception caught.
2.2.5 Undo Feature
This feature is facilitated by State and StateManager classes.
-
GradeCommand.testgrade(stringGrade)- checks if the input grade is valid according to NUS grading schematic -
GradeCommand.grade(moduleModule)- assigns the specific module present in the module list, the grade and moduleCredit attributes.
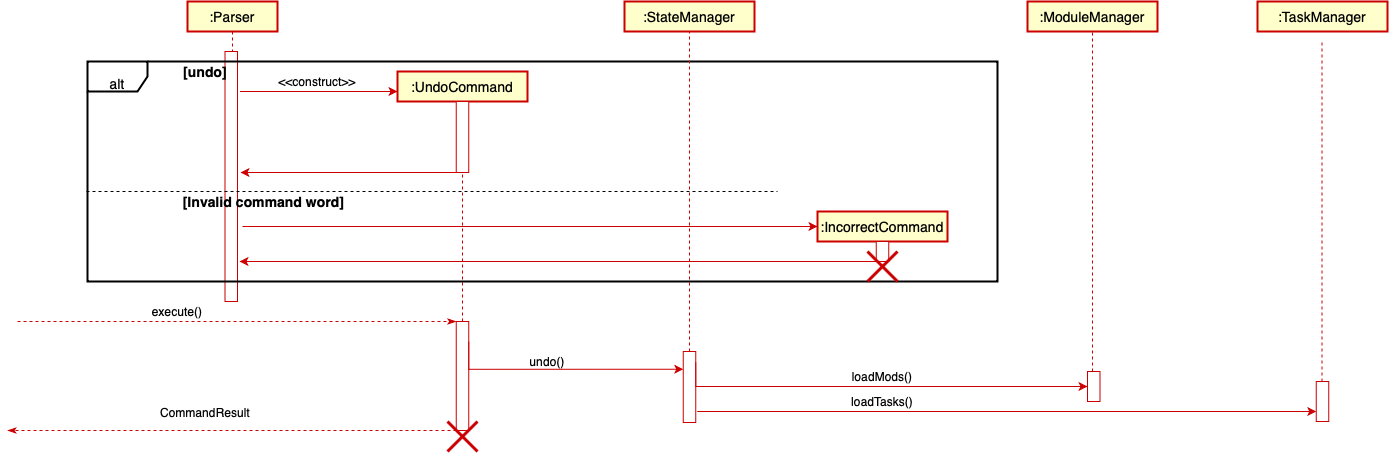
As seen from the sequence diagram above, this is the flow of an Undo command. The Parser parses the user's input, and construct the default UndoCommand. When the Undo Command object executes, the undo() method in the StateManager class will be called. In the StateManager, the previous copies of the data are encoded as Json and stored in a stack. When the undo() is called, the StateManager will pops the top copy in the stack. After that, the StateManager class will notify TaskManager and Module Manager to load from the encoded saved copies. To do that, it will facilitate the load methods, loadMods() loadTasks() from TaskManager and ModuleManager to set the data.
Given below is an example usage scenario and how the undo feature behaves at each step.
-
The user launches the application. The user inputs
add -m CS2101into ra.VI, as the user wants to note down a module named ‘CS2101' and add it to their module list. This input is received by the Ui ,which processes it into a string. The parser parses the string and allocates it to the AddCommand where it is added to the list of modules. -
The user finds the module just added is wrong. Thus, he wants to undo the previous
add -m CS2101command. -
The user inputs
undointo ra.VI. The input is received by the Ui, which then passes the input to Parser and parsed to an Undo command. -
Then the execution process of the Undo command will makes the method calls demonstrate above in the diagram.
-
More importantly, the Undo command only works for those ‘data-changed' operations. Those operations refer to ‘add', ‘delete', ‘edit' commands.
2.2.6 Timetable Feature
This feature is facilitated by the TimeTableManager class and TimeTableCommand class. Extending from the abstract TimeTableCommand class are the TimeTableAddCommand, TimeTableDeleteCommand, TimeTableViewCommand and TimeTableResetCommand classes.
- Add a lesson - Add a lesson to the timetable through
TimeTableManager.addLesson() - Delete a lesson - Delete all associated lessons from the timetable through
TimeTableManager.deleteLesson() - View today's timetable - List all lessons for today through
TimeTableManager.getSpecificDayLessons() - View this week's timetable - List all lessons in this week through
TimeTableManager.getSpecifiedWeekLessons() - Reset timetable - Reset the whole timetable through
TimeTableManager.initialiseTimetable()
2.2.6.1 Add lesson/s to timetable
Given below is an example scenario to add a lesson to the timetable and how the timetable feature behaves at each step.
-
The user launches the application for the first time. ra.VI asks for the current NUS week. This input is parsed and initialises the
TimeTableManager. -
The user inputs
add -m CS2101, as the user wants to note down a module namedCS2101and add it to their module list. -
The user inputs
timetable -add CS2101 TUESDAY 0800 1000 LECTURE 1. This means the user wants to add aCS2101 LECTUREthat occurs once a week onTUESDAY 0800 1000. ThisCommandwill be parsed and eventually returns aTimeTableAddCommand. -
The
TimeTableAddCommandis executed, returning aCommandResultcontaining a success message if the lesson has been successfully added. Otherwise, an exception message will be shown explaining the exception to the user.
Common reasons for failure include:
- Wrong command format
e.g.timetable -add CS2101 TUE 0800 1000 LECTURE 1
e.g.timetable -add CS2101 TUESDAY 8am 10am LECTURE 1
e.g.timetable -add CS2101 TUESDAY 0800 1000 NONSENSE 1
e.g.timetable -add CS2101 TUESDAY 0800 1000 LECTURE 5 - Module does not exist in module list
e.g.timetable -add CS2101 TUESDAY 0800 1000 LECTURE 1but the module list does not containCS2101. Available modules can be found by enteringlist -me.g.timetable -add BAD TUESDAY 0800 1000 LECTURE 1but the module list does not containBADandBADis not a valid NUS module.
2.2.6.2 Delete lesson/s from timetable
Given below is an example scenario to delete a lesson from the timetable and how the timetable feature behaves at each step.
-
The user launches the application for the first time. ra.VI asks for the current NUS week. This input is parsed and initialises the
TimeTableManager. -
The user inputs
add -m CS2101, as the user wants to note down a module namedCS2101and add it to their module list. -
The user inputs
timetable -add CS2101 TUESDAY 0800 1000 LECTURE 1. This means the user wants to add aCS2101 LECTUREthat occurs once a week onTUESDAY 0800 1000. ThisCommandwill be parsed and eventually returns aTimeTableAddCommand. -
The user inputs
timetable -del TUESDAY 1. This means the user wants to delete theCS2101 TUESDAY 0800 1000 LECTURElessons. The1at the end reflects lessons on index1onTUESDAYas reflected bytimetable -dayortimetable -week. ThisCommandwill be parsed and eventually returns aTimeTableDeleteCommand. -
The
TimeTableDeleteCommandis executed, returning aCommandResultcontaining a success message if the lessons have been successfully deleted. Otherwise, an exception message will be shown explaining the exception to the user. Common reasons for failure include:
- Wrong Command format
e.g.timetable -del TUE 1. - Lesson does not exist in the timetable
e.g.timetable -del TUESDAY 5but the timetable does not contain a lesson/s onTUESDAYat index5. Current lessons can be found by enteringtimetable -dayortimetable -week.
2.2.6.3 View the timetable
Given below is an example scenario to view the timetable for the day.
-
The user adds a lesson to the timetable for today, for e.g.
timetable -add CS2101 TUESDAY 0800 1000 LECTURE 1. -
The user inputs
timetable -day. -
The timetable for the day is shown to the user. The user is able to see the Tuesday CS2101 lecture that was previously added in step 1.
2.2.6.4 Filter the timetable
Given below is an example scenario to filter the timetable for CS2101 LECTURE.
-
The user adds a lesson to the timetable for today, for e.g.
timetable -add CS2101 TUESDAY 0800 1000 LECTURE 1. -
The user inputs
timetable -filter CS2101 - - - LECTURE -
All CS2101 lectures in the timetable are shown to the user. The user is able to see the CS2101 weekly lectures that were previously added in step 1.
- Wrong Command format
e.g.timetable -filter
2.2.6.5 Reset the timetable
Given below is an example scenario to reset the timetable.
-
The user inputs
timetable -reset. -
ra.VI will ask for the current NUS week. This input is parsed and re-initialises the
TimeTableManagerwith a newTimetable.
2.2.7 [Proposed] Notes Feature

The proposed notes feature is facilitated by the NotesManager class and abstract NotesCommand class Extending from the abstract NotesCommand class are the NotesAddCommand, NotesListCommand, NotesDeleteCommand, and NotesViewCommand classes.
It implements the following operations:
-
NotesManager.addNote()- Add a note -
NoteManager.listNote()- View the list of notes and their indexes -
NoteManager.deleteNote()- Delete a note -
NoteManager.viewNote()- View a particular note
2.2.7.1 Add notes
Given below is an example scenario to add a note and how the notes feature behave at each step
Step 1. The user inputs note -add Orbital Mechanics: Application of ballistics and celestial mechanics, as the user wants to add a note. Step 2. This input is parsed by NotesCommandParser and it returns NotesAddCommand. Step 3. NotesAddCommand is executed, returning a CommandResult containing a success message if the note has been added successfully. Otherwise, an error message will be shown explaining the error to the user.
2.2.7.2 Viewing list of notes
Given below is an example scenario to view the list of notes and how the notes feature behaves at each step.
Step 1. The user inputs note -list as the user wants to view the list of notes. Step 2. This input is parsed by NotesCommandParser and it returns NotesListCommand. Step 3. NotesListCommand is executed, returning a CommandResult containing the list of notes and their indexes. Otherwise, an error message will be shown explaining the error to the user.
2.2.7.3 Delete a note
Given below is an example scenario to delete a note and how the notes feature behaves at each step.
Step 1. The user inputs note -del 1 as the user wants to delete the note with index 1. Step 2. This input is parsed by NotesCommandParser and it returns NotesDeleteCommand. Step 3. NotesDeleteCommand is executed, returning a CommandResult containing a success message if the note has been deleted successfully. Otherwise, an error message will be shown explaining the error to the user.
- Currently available notes and their indexes can be found by entering
notes -list
2.2.7.4 View notes
Given below is an example scenario to view a particular note in the list Step 1. The user inputs note -view 1 as the user wants to view the note with index 1. Step 2. This input is parsed by NotesCommandParser and it returns NotesDeleteCommand. Step 3. NotesViewCommand is executed, returning a CommandResult containing the note if the note has been shown successfully. Otherwise, an error message will be shown explaining the error to the user.
2.2.8 Colored Output
The output of ra.VI is colored to improve readability and draw attention to important parts of messages. To color ra.VI's output, we used the JANSI library which uses ANSI escape codes to color printed messages on the terminal. As ANSI escape codes are universally supported on most terminals, we do not foresee major compatibility issues with the mainstream OSes.
We use JANSI's ansi().render() to wrap ra.VI's output in TextUi's outputToUser function. So, we gain the ability to color (and otherwise decorate) ra.VI's text using JANSI's formatting standards.
An example: To make "Hello" red, we change it to "@|red Hello|@".
centerString(String s)inTextHelperis designed to remove these formatting artifacts and center the text properly. However,centerString(int width, String s)does not remove the JANSI artifacts and hence should not be used with JANSI.
3 Appendix A: Product scope
3.1 Target user profile
The target user profile for ra.VI is described by the following:
- A student of NUS (a freshman in particular).
- Has a need to manage their school related tasks, classes and notes.
- Prefers desktop apps over other types.
- Types fast.
- Prefers typing to mouse interactions.
- Reasonably comfortable using CLI apps.
3.2 Value proposition
A common problem amongst freshmen is the inability to organise all the incoming information.
NUS places a focus on taking responsibility for your own learning, so it might be a tough transition from tertiary education.
A lot of students miss lessons, assignments, and even exams, just because they're struggling to adapt to the new environment.
ra.VI helps students to manage their school-related information in a compact, stripped-down interface that does not bombard them with too much information.
When you receive your modules and lessons, simply enter them into ra.VI as they arrive. ra.VI will keep track of all of it for you.
You can create tasks, give them deadlines, and tag them to certain modules. You can see all of your tasks and deadlines at a glance.
You can even write and save your notes in ra.VI, uncluttering your work environment even further.
ra.VI is even integrated with NUSMods, bringing its comprehensive library of information to your fingertips.
All the above features are wrapped in a compact, no-frills command-line interface. No confusing menus and dropdowns to distract you; only simple commands to give you what you want.
4 Appendix B: User Stories
| Version | As a … | I want to … | So that I can … |
|---|---|---|---|
| v1.0 | new user | see usage instructions | refer to them when I forget how to use the application |
| v1.0 | user | save and load my information | store all my school related data in the application |
| v1.0 | user | add tasks to the application | keep track of all my tasks |
| v1.0 | user | add deadlines for tasks to the application | keep track of when I need to complete the tasks |
| v1.0 | user | add modules to the application | keep track of them during the school term |
| v1.0 | user | delete tasks from the application | keep track of new tasks |
| v1.0 | user | delete modules from the application | keep track of new modules |
| v1.0 | user | edit task descriptions | make changes or updates to my tasks |
| v1.0 | user | edit module code | make changes to module codes in the list |
| v1.0 | user | mark task as done | update the completion status of my tasks |
| v1.0 | user | view my task list | be aware of the tasks I have added to my list |
| v1.0 | user | view my module list | be aware of the modules I have added to my list |
| v2.0 | user | receive help easily | use ra.VI efficiently |
| v2.0 | user | add lessons to my timetable | view my timetable with a simple command |
| v2.0 | user | delete lessons from my timetable | view my accurate timetable with a simple command |
| v2.0 | user | view my timetable quickly | be aware of my classes and prepare for them quickly |
| v2.0 | user | filter the lessons in my timetable | be aware of specific classes and prepare for them quickly |
| v2.0 | user | view a summary of my tasks | be aware of my tasks and work on them as needed |
| v2.0 | user | grade my modules | keep track of my grades for respective modules |
| v2.0 | user | calculate my accumulative cap | keep track of my progress in university |
| v2.0 | user | undo unintended commands | make amends quickly |
| v2.1 | user | reset my timetable | prepare for another semester |
5 Appendix C: Non-Functional Requirements
- Should work on any mainstream OS with Java 11 or above installed.
- A user with above average typing speed for regular English text (i.e. not code, not system admin commands) should be able to accomplish most of the tasks faster using commands than using the mouse.
6 Appendix D: Glossary
- IntelliJ - An Integrated Development Environment (IDE) designed for Java software development.
- CLI - Command Line Interface
- UML - Unified Modeling Language
- Terminal - Any operating system shell with a command-line interface.
- Mainstream OS - Windows, mainstream distributions of Linux, and macOS.
7 Appendix E: Instructions for manual testing
Given below are instructions to test the app manually.
- Download the latest version of
ra.VIfrom here and copy it into an empty folder. - Open a new terminal window and navigate to the same directory where
ravi.jaris located. - Enter the command
java -jar ravi.jarinto the terminal window to launch the application. The application should now be running. - Enter the command
helpto get a list of all available commands and its usages. - For a detailed list on available features, refer to the user guide.
- Simply enter
byeto terminate and exit the application.
7.1 Task
7.1.1 Adding a task
- Adding a task without deadline
- Test case:
add -t read a book
Expected: Taskread a bookwill be added to the task list. Details of the success of the added task will be shown. - Test case:
add -t
Expected: As there is no task to add, details of the associated error message will be shown.
- Test case:
- Adding a task with deadline
- Test case:
add -t read a book -by 20-10-2020 1800
Expected: Taskread a bookwill be added to the task list. Additionally, the deadline will be added to the task. Details of the added task is shown in the status message. - Test case:
add -t read a book -by 20/20/2020
Expected: Invalid deadline20/20/2020will not allow the task to be added to the task list. Details of the associated error message will be shown.
- Test case:
7.1.2 Deleting a task
- Deleting a task
- Test case:
del -t 1wheretaskis index0in the task list.
Expected: The DeleteCommandParser parses1and converts it to index0in the task list. As tasktaskis the index0in the task list,taskwill be deleted from the task list. - Test case:
del -t 10where there is no task of index9in the task list.
Expected: The DeleteCommandParser parses10and converts it to index9in the task list. As there is no task of index9in the task list, the deletion will give an error. Details of the associated error message will be shown.
- Test case:
7.1.3 Editing a task
- Editing a task
- Test case:
edit -t 3 read a book, where task index3has already been added previously into the task list.
Expected: As the task at index3is in the task list, the task description will be edited and changed toread a book. Details of the success of the edit task will be shown. - Test case:
edit -t 10 meet girlfriend, where there is no task10in the task list.
Expected: As there is no such task in the task list, an error will be given to the user. Details of the associated error message will be shown.
- Test case:
7.1.4 Marking a task as done
- Marking a task as done
- Test case:
done 1, wheretaskis index0in the task list.
Expected: The DoneCommandParser parses1and converts it to index0in the task list. As tasktaskis the index0in the task list,taskwill be marked as done. - Test case:
done 10, where there is no task of index9in the task list.
Expected: The DoneCommandParser parses10and converts it to index9in the task list. As there is no task of index9in the task list, an error is thrown. Details of the associated error message will be shown.
- Test case:
7.1.5 Viewing the task list
- Viewing the task list
- Test case:
list -t, with the tasks "read book" and "buy stuff" in the task list.
Expected: A list containing the two tasks will be shown. - Test case:
list -twhen no tasks have been added.
Expected: As there are no tasks in the list, a message signifying the empty list is shown.
- Test case:
7.1.6 Viewing task summary
- Viewing the task summary
- Test case:
summary, when the list contains ``` - Read a book [x]
- Return book [x], by 06:00PM, Tuesday, 20 Oct 2020
- meeting [√], by 08:00PM, Thursday, 22 Oct 2020 ``` Expected: The task summary will be shown, each task belonging to their respective categories.
- Test case:
7.2 Module
7.2.1 Adding a module
- Adding a module
- Test case:
add -m CS2113T
Expected: ModuleCS2113Twill be checked against the NUS module list.
SinceCS2113Tis a valid module, it will be added to the module list. Details of the success of the added module will be shown. - Test case:
add -m Fake Mod
Expected: As there is no such moduleFake Modin the NUS module list, it will not be added to the module list. Details of the associated error message will be shown.
- Test case:
7.2.2 Deleting a module
- Deleting a module
- Test case:
del -m CS2113TwhereCS2113Thas been previously added to the module list.
Expected: As moduleCS2113Tis in the module list,CS2113Twill be deleted from the module list. Details of the success of the deleted module will be shown. - Test case:
del -m 0where there is no module0in the module list.
Expected: As there is no such module in the module list, the deletion will give an error. Details of the associated error message will be shown.
- Test case:
7.2.3 Editing a module
- Editing a module
- Test case:
edit -m CG2271 GER1000, where moduleCG2271has already been added previously into the module list.
Expected: AsCG2271is in the module list, the module will be edited and changed toGER1000. Details of the success of the edit module will be shown. - Test case:
edit -m ACC1101 GER1000, where there is no moduleACC1101in the module list.
Expected: As there is no such module in the module list, an error will be given to the user. Details of the associated error message will be shown.
- Test case:
7.2.4 Viewing the module list
- Viewing the module list
- Test case:
list -m, with the modules "CS2113T" and "CS2101" in the module list.
Expected: A list containing the two module codes, MCs, and grades associated will be shown. - Test case:
list -mwhen no modules have been added.
Expected: As there are no modules in the list, a message signifying the empty list is shown.
- Test case:
7.3 Viewing help messages and prompts
- Viewing the help message for a specific command
- Test case:
help add
Expected: A help message containing theaddcommand format and examples of its usage is shown. - Test case:
add CS2101
Expected: As this is an incorrect command format, a help message containing the correct format is shown. A prompt message suggesting the use ofhelpis also shown.
- Test case:
7.4 Timetable
7.4.1 Amending the timetable
- Adding a lesson
- Test case:
timetable -add CS2113T MONDAY 1200 1400 LECTURE 0whereCS2113Tis a module in module list.
Expected: The TimeTableCommandParser parses the lesson parameters,CS2113Tis the associated module,MONDAY 1200 1400 LECTUREreflects that the lesson is a lecture on Monday from 12pm to 2pm.0indicates that this lesson only occurs once. SinceCS2113Tis a valid module in the module list, the lesson will be added to the timetable. Details of the success of the added lesson will be shown.
- Test case:
- Deleting a lesson
- Test case:
timetable -del MONDAY 0where the only lesson on MONDAY is a CS2113T lecture from 12pm to 2pm.
Expected: The TimeTableCommandParser parses the lesson parameters, and searches for a lesson/s of index0onMONDAY. However, the timetable does not contain such lesson/s. Details of the associated error message will be shown.
- Test case:
7.4.2 Viewing the timetable
- Timetable for the day
- Test case:
timetable -day
Expected: If there are no lessons for today, this information is shown to the user. Otherwise, the lessons for today are shown to the user.
- Test case:
- Timetable for the week
- Test case:
timetable -week
Expected: The lessons for Monday to Sunday of this week are shown to the user.
- Test case:
7.4.3 Filtering the timetable
- Filter all lessons
- Test case:
timetable -filter CS2113T - - - -, which filters CS2113T lessons only.
Expected: All CS2113T lessons are shown to the user. - Test case:
timetable -filter CS2113T - - - LECTURE, which filters CS2113T lectures only.
Expected: All CS2113T lectures are shown to the user. - Test case:
timetable -filter CS2113T MONDAY 1200 2000 LECTURE, which filters CS2113T lectures on Monday between 1200 and 2000 only.
Expected: All CS2113T lectures on Monday between 1200 and 2000 are shown to the user.
- Test case:
7.4.4 Resetting the timetable
- Reset the timetable
- Test case:
timetable -reset
Expected: TimeTableManager clears and reinitialises the timetable. The user is prompted to input the current week for reinitialisation.
- Test case:
7.5 Calculating the Accumulated Cap after the current semester
- Calculate the Cap:
- Test case:
cap, where the modules in module list has already been graded individually.
Excepted: Each module inModuleManagerwill be checked for itsmoduleCreditandgrade. Using the CAP formula, the user's most updated CAP will be calculated and shown to user.
- Test case:
7.6 Grading an existing module in module list
- Grade the module:
- Test case:
grade CS2101 4 A+, where the moduleCS2101has been previously added to the module list.
Expected: ModuleCS2101will be checked if its inside ModuleManager. SinceCS2101exists then the attributes of4andA+which are module credit and grade, will be added to the Module.
- Test case:
7.7 Undo the previous command
Do note that undo will only undo the last command that edited the data files, namely commands with a PromptType of EDIT.
- Undo:
- Test case:
undo, after the user has inputadd -t finish work.
Expected: The taskfinish workis added to the task list. As the AddTaskCommand has aPromptTypeofEDIT, the addition of the task:finish workto the task list will be undone. Details of the successful undo will be shown. - Test case:
undo, without any prior commands with aPromptTypeofEDITsince the program launch.
Expected: Due to the fact that there have been no commands with aPromptTypeofEDIT, nothing will be undone and details of the associated error message will be shown.
- Test case:
7.8 Saving data
Do note that if you exit the application without entering bye, ra.VI will still be able to retrieve data that was amended during that session. However, this is not a recommended way to use ra.VI.
Tampering with the files created by ra.VI, through any other application, may also cause ra.VI to malfunction and is strongly discouraged.
- Add tasks and modules, then exit
- Test case:
add -t task 1,add -m CS1010,bye
Expected:user_task_data.jsonanduser_mod_data.jsonshould be created in<ROOT>/data/with a JSON representation of the task and module.
- Test case:
- Loading tasks and modules
- Test case: Run ra.VI again after the first test case, then run
list -tandlist -m.
Expected:task 1should be shown in the task list, andCS1010should be shown in the module list.
- Test case: Run ra.VI again after the first test case, then run
The Graphical User Interface V3.0
The graphical user interface and its related features are supposed to released in the next iteration v3.0 Thus, the GUI is currently still a separate branch. The professor asks me to attach the GUI features here to fulfill my contribution to the DG The following are some features implemented in the GUI branch
Top level classes
This is a class diagram of the top-level of ra.Vi GUI version.
The classes depicted here are those which are direct dependencies of the main class Ravi.
The various dependencies of the classes depicted here are not shown to avoid cluttering, and are described in later sections.

Command Family
The Command family of classes in GUI branch are regarded as the supplement for the master branch (CLI). The Command family of classes are nearly all derived from the abstract Command class, except for CommandResult and PromptType. All Command classes belong to the Command package. This is shown in the diagram below. 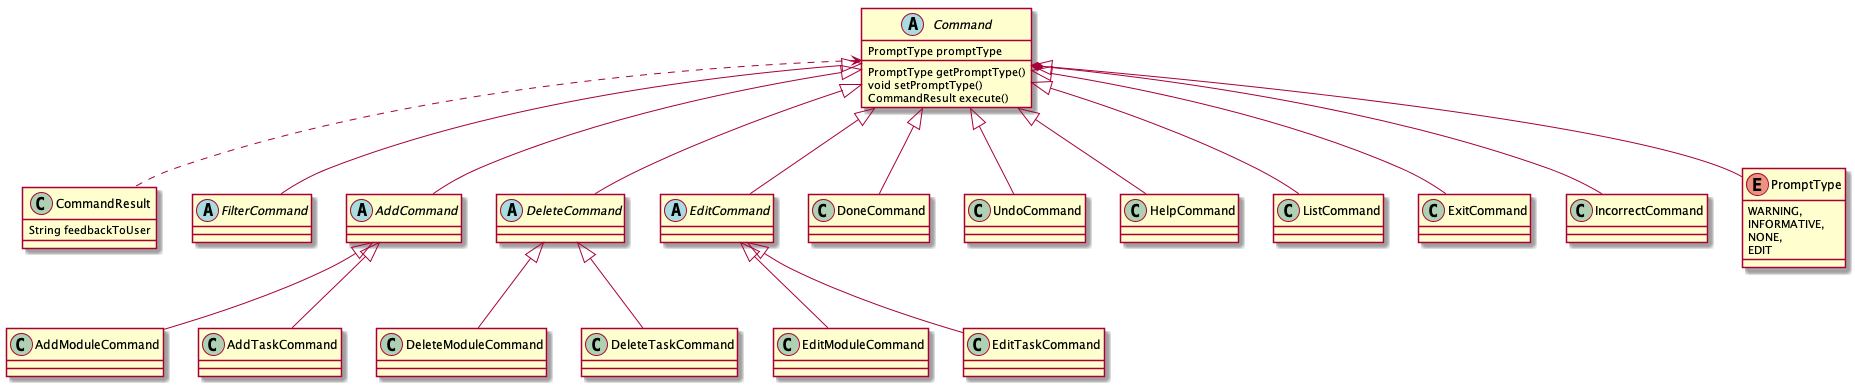
Graphical User Interface Features
The graphical user interface is designed to help user to have a more intuitive concept of the modules and tasks. The MainStage class implements the Initializable class. The DirectoryTree object is created when the showDirectoryTree() method is called in the MainStage class. The DailyTaskWindow object is created when the showDailyTask() method is called in the MainStage class.
Feature explanation
General Add Feature
This feature is facilitated by the ModuleManager and TaskManager classes. This is the general version of add feature. The Parser class will parse the general AddCommand to AddModuleCommand or AddTaskCommand according to the user current level. If the user is at the root level, the general AddCommand will be parsed to AddModuleCommand. If the user is at the Module level, the general AddCommand will be parsed to AddTaskCommand.
Change directory Feature
This feature is facilitated by the DirectoryTraverser classes.
It extends from the abstract Command class.
This feature implements the following operations:
- Change to a specific directory (module/task)
- Jump out of the the current directory (module/task)
Given below is an example scenario to show how the change directory feature behaves at each step. Suppose the user is currently at the root level. The user inputs cd CS2113T, to move to the module CS2113T directory. The ChangeDirectoryCommand object will first examine if the user has specify the targeted directory. If the user does not specify the target directory: The method findNextDirectory("CS2113T") in DirectoryTraverse class will be called, to examine the validity of the userInput directory name CS2113T. If the userInput directory name is valid, then the traverseDown() or traverseUp() method in the DirectoryTraverse class will be called. If the userInput directory name is invalid, a DataNotFoundException will be thrown. However, there is another boundary case, where the user tries to traverse beyond the boundary levels, such as the root level and task levels. Then another exception DirectoryTraversalOutOfBoundsException will be thrown. If the user like the example, has specified the directory CS2113T: The traverseTo(CS2113T) method in the DirectoryTraverse class will be called to set the currentDirectoryLevel attribute to the specified the directory.
Week Command Feature
This feature works with the GUI components to create a upcoming week table for users. A window will pop out and the task number on the each day of the upcoming week will be listed. It extends from the abstract Command class.
Directory Command Feature
This feature works with the GUI components to create a module-list table for users. A window will pop out and all module with related tasks will be listed. It extends from the abstract Command class.